|
OrbiterSim | FAQ | Acronyms | Add-ons | Screen Shots | Orbiter Tutorials | >>Developer
Step by Step guide to making an Add-on using Spacecraft2.DLL
By Kev Shanow ( Kev33 )
First of all you need to download some free utilities, they are
Vinka's Spacecraft2.DLL , Anim8or , Vinka's 3ds2msh converter and the Orbiter SDK...The links to these files are as follows :-
Spacecraft2.DLL and 3ds2msh at http://users.swing.be/vinka/
Anim8or at http://www.anim8or.com/
Orbiter SDK at http://www.medphys.ucl.ac.uk/~martins/orbit/orbit.html
Now
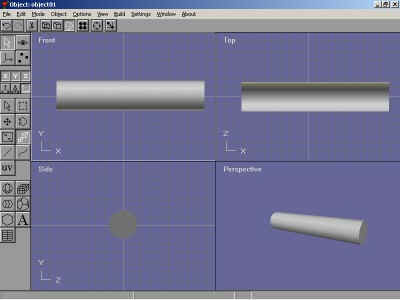
we are ready to start, open Anim8or and begin making your simple spacecraft .Start by making a cylinder like this :-
Then click on build and click convert to mesh. Press the Object/Point Edit and use the drag select to select the first
row of points, then use the scale to scale them down into a point like so :-
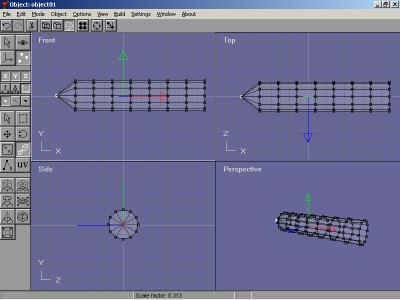
Do the same for the rear points and move the rear points to the center of the cylinder and also scale the other
points so that it looks like this :-
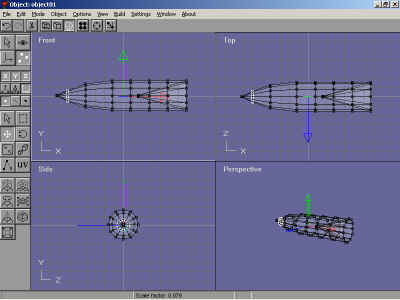
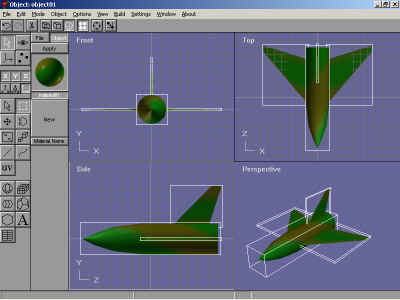
Now you're ready to add the wings and tail using the Add Cube function. Make a cube and convert it to a mesh,
manipulate it like you did the cylinder until it look like this :-
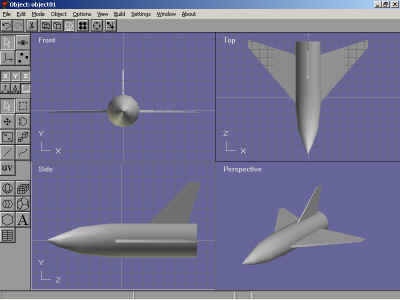
Now you're ready to add the textures, make a texture using Paintshop or any other paint software and save it as a
.bmp file, note you must save at 64x64 , 128x128 , 256x256 or 512x512 etc. Once you've saved your texture you
can apply it to your mesh by doing the following:- Click on Materials, double click New, click the little minus sign
next to Diffuse, click Load Texture and then click on your texture. Click on your texture , click OK then OK. Use Drag Select to select all the parts of your mesh and click apply. It will look like this :-
Click on Object then Export and save your model as a 3DS file. Now we are ready for the next stage in building your
Add-on.. Next you'll need to use dxtex that comes with the Orbiter SDK. Open up DxTex and load your texture, then
click format, change image format and then click DXT1, and save your texture as a .dds file. Now we will need to
convert the 3DS file to a .msh file using Vinka's 3ds2msh Converter.You'll need to do this in a DOS window.Open a DOS window find your 3DS file and type the following ,:--
3ds2msh i=Simple-Craft o=Simple-Craft s=.3 a=-xyz f=v
Now Copy the texture .dds file to the Orbiter\Texture folder and the mesh to the Orbiter\Meshes folder.Make a
backup of the mesh file to use later on. Now we need to manipulate the mesh using the ShipEdit utility found in the
Orbiter\OrbiterSDK\Utils folder..OPen ShipEdit, load your mesh and click on Transform , then click Rotate and fill in
-90 in the Rotate around x-axis, and click Rotate x.. Then save your mesh. You can also use this to scale your
mesh to make it bigger or smaller. Now you will need to use your backup mesh to copy and paste you texture name
or names to your mesh, because ShipEdit does not save the Texture names. Copy and paste all the names under Textures at the end of the mesh using notepad or wordpad, it looks like this :-
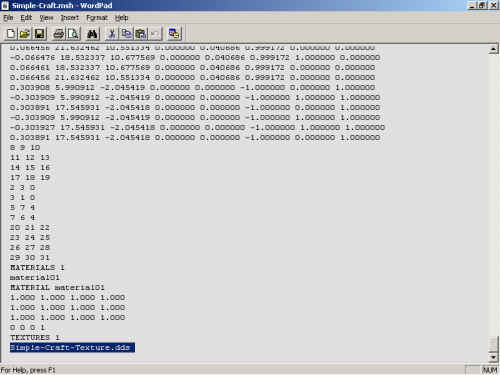
Copy and paste from your backup mesh to your modified mesh. and save...Now we can make the config file for your
Craft. Use notepad or wordpad to make an .ini file for your craft, the .ini file must be saved in the
Orbiter\Config\Spacecraft folder.Fist we will make the Particle stream configs for the Crafts Engine Smoke, it will look like this :-
[PARTICLESTREAM_1]
NAME=engine
SRCSIZE=0.2
SRCRATE=1600
V0=100.0
SRCSPREAD=0.05
LIFETIME=0.5
GROWTHRATE=5
ATMSLOWDOWN=3.0
LTYPE=EMISSIVE
LEVELMAP=LVL_SQRT
LMIN=0
LMAX=1
ATMSMAP=ATM_PLOG
AMIN=1e-5
AMAX=0.1
Then we must set up the mesh name,thrust,fuel and landing points etc for the craft like so :-
[CONFIG]
MESHNAME="Simple-Craft"
SIZE=25
EMPTY_MASS=10000
FUEL_MASS=20000
MAIN_THRUST=6e5
RETRO_THRUST=3e5
ATTITUDE_THRUST=6e5
ISP=50000
TRIM=0.05
PMI=(15.5,22.1,7.7)
CW_Z_POS=0.09
CW_Z_NEG=0.09
CW_X=2.
CW_Y=1.4
CROSS_SECTION=(53.0,186.9,25.9)
COG=2.47
PITCH_MOMENT_SCALE=0.00005
BANK_MOMENT_SCALE=0.00005
ROT_DRAG=(1.5,1.5,1.5)
WING_ASPECT=0.7
WING_EFFECTIVENESS=2.5
LAND_PT1=(0,-1.1,9)
LAND_PT2=(-4,-1.95,-5)
LAND_PT3=(4,-1.95,-5)
VISIBLE=1
CAMERA=(0,1.22,5.4)
MAIN_PSTREAM1=engine
These are just temporary settings, we will need to adjust them later, we'll need to change the landing points etc to
match up with the mesh.. Last we need to add the engine placement and thrust direction and size like so :-
[EX_MAIN_0]
OFF=(0,0,-2)
DIR=(0,0,-1)
LENGTH=0.001
WIDTH=0.001
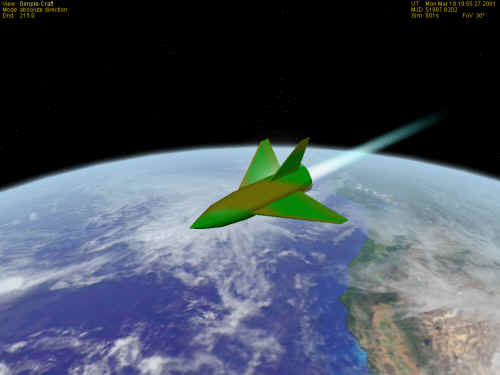
These will also need to be adjusted after we test the craft.. Next we need to make a Scenario file using notepad or wordpad. This must be saved as a .scn file in the Orbiter\Scenarios folder.It will look like so :-
BEGIN_DESC
Simple-Craft at KSC airport...Press + and CTRL to engage your thrust...
END_DESC
BEGIN_ENVIRONMENT
System Sol
Date MJD 51987.8209125220
END_ENVIRONMENT
BEGIN_FOCUS
Ship Simple-Craft
END_FOCUS
BEGIN_CAMERA
TARGET Simple-Craft
MODE Extern
POS 3.69 -138.84 -12.16
TRACKMODE AbsoluteDirection
FOV 30.00
END_CAMERA
BEGIN_HUD
TYPE Surface
END_HUD
BEGIN_SHIPS
Simple-Craft:Spacecraft\Spacecraft2
STATUS Landed Earth
POS -80.6858943 28.5906644
HEADING 330.01
FUEL 1
PRPLEVEL 0:1.000
NAVFREQ 94 481
CONFIGURATION 1
CURRENT_PAYLOAD 0
SEQ 0 -2 0.000000
END
END_SHIPS
After you've save it, we are ready to start Orbiter to test the Craft, and make changes to the landing points etc.
After the test we see that we need to make the following changes,
Change the landing points to :-
LAND_PT1=(0,-11,9)
LAND_PT2=(-4,-11,-5)
LAND_PT3=(4,-11,-5)
And change the Engine thrust and smoke points to :-
[EX_MAIN_0]
OFF=(0,-6,-11)
DIR=(0,0,-1)
LENGTH=77.33
WIDTH=3
And now you're good to go, You've made your first Add-on..
Bye for now...
Kev33..
Texturing your model with Anim8or >>
3D Model to Spaceflight ( easy tutorial )
Related Links:
Spacecraft2.dll Tutorial (with samples)
Vinka Page (spacecraft.dll )
Radu's Page (mesh converter)
|