|
Astronomy Portal to the Heavens, Deep Sky and Universe
|
|
OrbiterSim | FAQ | Acronyms | Add-ons | Screen Shots | Orbiter Tutorials How to build planet textures with LunarCell LunarCell is a Photoshop plugin that can be use to make planet textures. The flaming pear website has the plugin available for download. It does have its limitations though. For example it doesn't create mountain ranges or water ways in any great detail. It simply uses one type of texture to simulate the look of elevation. So no matter how many mountainous planets you create they all end up looking the same. All that said though you can create some beautiful planets using the following techniques. Begin by opening Photoshop with a small 1024 X 512 canvas. This canvas is for rapid texture development and testing. Later when you are happy with the results you can save the LunarCell settings as a preset. At that time you will open a new 4096 X 2048 pixel canvas (Orbiter level 7 ) and load your preset texture into it. With the blank canvas ready to go, open the LunarCell filter in Photoshop. A dialog box will appear with controls for these elements Planet,
Climate, Air, Clouds and Cities. To design your own planet textures for Orbiter, you will only need to familiarize yourself with the controls for the Planet and Climate elements. LunarCell Presets: eharm_presets01 gas_world01.q1q In the very center of the LunarCell dialog box is an icon for selecting your map mode. To build a planet texture to be used with Orbiter the mural map should be selected. Under the map mode icon there is a series of buttons, clouds, export, load, save and undo . Use the load button to load the one of the gas presets offered above. Notice that my presets load in normal map mode. This gives you an idea of what the planet will look like in Orbiter. So the first thing to do is change to mural mode. Gas Worlds Now the fun begins. By playing with the Planet and Climate settings you will create your world. For gas planets the land texture slider is set to zero. Click on the color box to change the main color theme. Under Climate there are three color boxes. Click on the desert color box to change the color around the equator. Move the desert slider to increase/decrease area of coverage. Use the ice slider and color box to adjust the color around the poles. Leave the sea level set to zero. Next hit the random seed button found next to the dice. This will randomly generate planet patterns. For gas planets the less complexity the better. I recommend below 10 or even zero. Keep hitting the random seed button until you find a planet pattern that you like. Save it as a preset and keep changing it up until you have a good selection of presets to choose from. One more thing you can do is set the light direction using the light control tool. It's that ball looking thing. Just play with it you'll see what it does. Warning do not roll the dice! - If you can't resist the temptation to roll the dice remember you have only one chance to undo or else you will have to reload a preset. Change the map mode to normal to get a quick glimpse of how the world will look as a globe. Slide the size control down around 50% to view. Just make sure you reset to mural before applying LunarCell to the canvas. When you are satisfied with your planet save as a new preset and hit the OK button to apply the texture. Smooth textures like what we have with gas planets develop a layered almost wooden ball appearence. This will become more magnified when the textured is applied in Orbiter. You can remove this effect in Photoshop with the built in noise filter. From the Photoshop menu select noise/add noise. Just a smidgen is necessary to remove this problem. Gas planet below left wood look, same planet on right corrected with noise filter
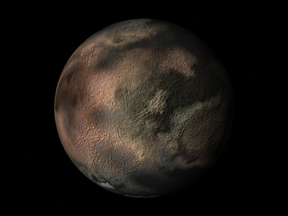
You now have a small texture to convert to Orbiter and test. When you are finally happy with how it looks in Orbiter you can load your saved preset into a larger canvas of the size you want. Rocky Worlds For earth like planets load the earth like preset offered here. Under climate move the sea level slider until you get the desired water/land ratio. Land shapes are strictly automatic. Hit the random seed button just like you did for the gas planet. Land planets without water are the easiest to create with LunarCell. Just set the sea level to zero and play with all the other planet and climate settings. Once you get the land shape you like you can begin working the overall planet color scheme. Planet colors must be earth tones. Be careful here otherwise you get a texture that looks cartoonish. Keep in mind too that the end globe shape in Orbiter may surprise you. Your lands will be stretched towards the poles. Use the normal map mode to get a sneak preview of what it would look like as a globe. Remember clouds will be added later as a separate map. Do not add them now. One problem you will find is that you can't get large continents with wide open oceans. If you set the land mass large the oceans begin to make puddles. If you set the sea level large then continents turn into islands. The solution to this is to set sea level low and use other Photoshop tools to expand the oceans manually outside of LunarCell. When you come to that place where you have a water planet that you can call home save it and change map mode to ocean mask. Save the ocean mask under a similar name. You will need to create two bmp files, the original and it's mask. Now you are ready to convert these two textures into an Orbiter water planet. Clouds Clouds are easy to create in LunarCell. Simply set the Planet control color to black and all other settings under Planet and Climate to zero. Make sure you are in the mural map mode. Move the cloud coverage slider and play with all the other slider controls under Clouds and Synth Clouds. Change the color and come up with whatever you want here. You can even download real clouds from weather satelites. This will be a seperate texture you will be using for your water planet. So make sure you save under a new name.
|
 The atmosphere, clouds and cities will be added after the planet textures are done. Therefore it is necessary to turn those elements off for now by
setting the first slider to zero. Or you can begin by using one of my presets offered here as a good starting point.
The atmosphere, clouds and cities will be added after the planet textures are done. Therefore it is necessary to turn those elements off for now by
setting the first slider to zero. Or you can begin by using one of my presets offered here as a good starting point.


Space Exploration DVDs
| Space Exploration Books | From the Earth to the Moon | Earthlight: NASA - Spectacular Views
|