|
Astronomy Portal to the Heavens, Deep Sky and Universe
|
|
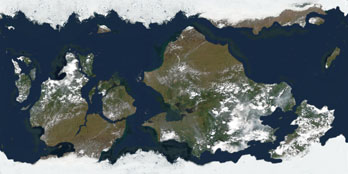
OrbiterSim | FAQ | Acronyms | Add-ons | Screen Shots | Orbiter Tutorials How to build your own Solar System Step 4. Build Textures for planets and moons cont... Method 3. Adding water and clouds to planets Using the techniques you have learned so far build a planet texture with oceans. For this type of planet I use real Earth satellite images or even those taken by the Space Shuttle. To get realistic looking land masses with mountain ranges the images have to be extremely large to begin with. If the image is not large enough even a small mountain range will be stretched half way around the globe. Not at all what we invisioned. What to do is start with a level 7 ( 4096 X 2048 ) canvas or level 8 if possible. Begin to gather several large aerial photos and paste then on the canvas. You can then fill in the blank canvas areas with oceans. Name this file planetname.bmp name of your choice.
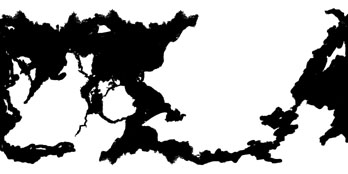
In this creation I didn't account for climate changes from equator to poles. Maybe next time I'll do better on this. Ice caps were place on each pole though. Stationary clouds were capture in the photo incidentally but later an additional cloud layer will be added for movement. Notice also with oceans it is not always necessary to use the wrap around filter. Next make a land mask for water reflection. This a solid black and white replica of your planet. Make the water all black, the reflective surfaces, and everything else is white. Name this planetname_landmask.bmp.
Note: this only works with the 031105 build of Orbiter. The older versions of Orbiter use a different method for water reflection. Use the pltex tool to convert your bmp planet texture into an Orbiter tex file. Then move this into the Textures folder and see how it looks. If everything is good then we are ready to make our planet land mask file. Here is how; pltex tool >> yes/no [y|n]: y >> binary/graded [b|g]: b >> all/selective [a|s]: s >> tolerance [%]: 0 >> File name < bmp >: planetname_landmask.bmp >> Resolution range <1...8> [min max]: 1 8 The tool will create two files for you. One called planetname_lmask.bin and one called planetname.tex. This is why we moved the original planetname.tex out of this folder earlier. You now have to manual rename this to planetname_lmask.tex. Now you may move these two flies into the Textures folder. However before this will work you must include visualization parameters in the planet congfig file. Here are the statements needed. ; === Visualization Parameters === Now for the clouds. There are several cloud textures available on the web. It easiest to just grab one of them, convert it and drop it in the Texture folder. The other thing you can do is just make a copy of the Earth_cloud.tex and rename it to your planetname_cloud.tex. I should also mention I had difficulty with my scenario crashing to desktop after adding water reflection. I finally narrowed it down to a bad lmask.bin file. You know that extra file that's produce with the land mask. For some reason it takes me two or three tries until I produce a workable bin file. That should do it. I'll be waiting to see your work. Have fun.
|
Space Exploration DVDs
| Space Exploration Books | From the Earth to the Moon | Earthlight: NASA - Spectacular Views
|

