|
Astronomy Portal to the Heavens, Deep Sky and Universe
|
|
OrbiterSim | FAQ |Acronyms | Add-ons | Screen Shots | Orbiter Tutorials Easy Flight to the Moon Open the scenario, New features - Visual enhancements - New Mir. Its 1:30am on March 14 2001 and we are in the Delta Glider docked to Mir Station with the moon sitting in view just beyond. Bring up the Align MFD and target the moon, you should be around seven degrees Rinc, so lets undock and pull back a little from Mir. First task is to align planes so get the Rinc down to near zero. Go for it! I'll be here when you come back... Notice that we are already at an altitude of just over 300K, a good orbit to start from. If you run this mission again from the ground, remember your target orbit will need to be 300K for the "burn by the numbers" explained below to work. This method is the easy because we don't have to do any math.
Once Aligned with the moon bring up the Surface MFD and the Map MFD. The Map MFD will show you the position of both your vessel and the moon in their current orbit around the earth. To reach the moon wait until the moon ( yellow + ) is 127 degrees to the right of your vessel. You may read the position of the moon in the Map MFD in degrees and the position of your ship in the Surface MFD. When the difference between the two is 127 degrees orient your ship prograde and begin to burn. Bring up the Orbit MFD so you can watch the telemetry. Burn until the Eccentricity ( Ecc ) is 0.9670. This will place your ApD just under 400M. This burn should last three or four minutes but make sure you watch the numbers so you don't over shoot. If you target the moon in the Orbit MFD you can watch the green elliptic grow and intersect the moons orbit, the brown circle. I usually ease off my thrust near the end of the burn to get the best numbers. If you over shoot you can always apply a little retro thrust to remove some energy. Sit back and coast for the next few days while we approach the moon. When the G indicator turns form brown to red the ship is then out of the Earths SOI and now under the suns SOI. We must wait until we are close enough to the moon to be under its SOI. By bringing up the HUD in Orbit mode it will display [ Moon ] in the upper left of the screen when you get close enough. Once under the moons SOI orient the ship prograde and you should be pointed near the moon. At this time bring up a second Orbit MFD and set the reference to the moon. This will display a much more accurate flight path. Fly until the you reach apoapsis. At apoapsis maneuver retrograde and burn until you have a Ped at the desired orbit. Next time around you can circularize your orbit. Congratulations you made it to the moon! Of course you can launch from the ground at any time and use the same method as above to reach the moon. The advantage is that you can align the planes during launch and be ready to set up the burn at 127 degrees counter clockwise to the moon. Only be sure to begin the burn at an altitude of 300K for the burn calculations are figured for this starting point. As you know burning opposite the moon would put apoapsis right at the moon at that time. However by burning at 127 degrees we allow our approach to lead the way giving the travel time of three days. Much like a football quarter back would lead his receiver. Instrument Method With this method you lunch into LEO or just start from Mir like we did above. Align planes with the moon as usual. Only this time we will use the Transfer MFD to do the calculations for us. This way we are not depending on predetermined numbers so we can start from any orbit altitude we want. The Transfer MFD will tell us when to start our burn and when to stop. The numbers we used above are not needed. To start bring up the Transfer MFD [Shift][X] and set the Moon as your Target [Shift][T]. If you want you can open the Map MFD as well so you can see where the moons location is relative to you. Now activate the HTO mode [Shift][X] of the Transfer MFD. Now set up an "Intersect" with the moon. In HTO mode you can "hypothetically" increase your orbit by increasing Dv [Shift][=] until the "No Intersect" message disappears. You will see the dashed green "hypothetically" orbit stretch out towards the lunar orbit and intersect it. You then rotate the Intersection Indicator, gray line [Shift][ , ] and [Shift][ .], until it aligns with the dashed yellow "Target at Intersection" line. This will tell us where the moon is going to be at the time of arrival. You may notice as you rotate around that you may need to increase Dv again to keep an intersect. Like always you are within one orbit from burn time. The two important display items are Dv and DTE. Dte - is the countdown clock for the next burn time That's all there is to it. You watch Dte until it counts down to zero and then start burning prograde. You can actually begin the burn up to 100 seconds ahead of time if you like. Once the burn begins watch Dv counting down so as to be prepare to manually shut down engines when Dv equals zero. Before Dv gets to zero back off the thrust so you can nail Dv at zero the best you can. Also you can cheat and use retro-thrust after the fact��but don't tell anybody you did this. You are now on your way to the Moon. Enjoy your flight. Related Links Apollo Lunar Landing Mission Tutorial
|
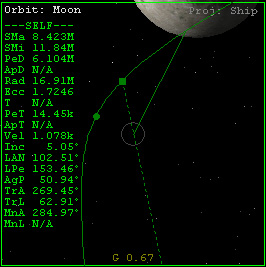 You will want to warp to 100x or even 1000x to speed things up. I usually
wait to I'm a little bit away from the Earth before I knock it up to 1000x. Only thing to do now is watch the brown line, moon current position and the green line, ship position. More importantly
watch the gravity reading at the bottom of the MFD. This will tell you when you are in the moons sphere of influence, SOI.
You will want to warp to 100x or even 1000x to speed things up. I usually
wait to I'm a little bit away from the Earth before I knock it up to 1000x. Only thing to do now is watch the brown line, moon current position and the green line, ship position. More importantly
watch the gravity reading at the bottom of the MFD. This will tell you when you are in the moons sphere of influence, SOI.
Space Exploration DVDs
| Space Exploration Books | From the Earth to the Moon | Earthlight: NASA - Spectacular Views
|